This is a strange article that includes several seemingly unrelated subjects. We need this because after
installing Ubuntu in VirtualBox we can only log in to
it via the window of VirtualBox. Instead of that we would like to be able to use some ssh client
such as the ssh command on an OSX or Linux, or Putty on a Windows machine.
We prefer the ssh client as that's how you'd interact with a Linux machine if it was running on a server at a hosting company. The ssh clients are also more suitable to work than the VirtualBox window.
VirtualBox and networking
VirtualBox creates virtual networking for the boxes you run in it. By default VirtualBox sets up a network with NAT (Network Address Translation). It gave our Linux box an IP address, configured your host machine as a router and allowed users on the machine to access the outside world. For example that's how we could Upgrade Linux packages and install new ones.
We cannot however access the box from the outside world. Not even from our host machine.
On one hand it is good that no one from the Internet can access our box, but we'd like to be able to ssh into the virtual box at least from our own Notebook/desktop computer. Later we'll also want to be able to set up several boxes and allow them to communicate among themselves.
There are plenty of ways to set this up. We are going to use "Host-only networks". That is a network configuration option provided by VirtualBox that allows your host to access your guest OS-es as if they were on some local network.
Create host-only network for VirtualBox
First we need to create or enable a Host-only network of VitualBox. Then we are going to tell each one of our (currently one :) VirtualBoxes to use that network as well.
Turn off your guest operating system (sudo shutdown -P now).
In order to create (or verify the existence of) a Host-Only network click on Global Tools in the top-right corner of the VirtualBox window. It should look like this:

Here click on Host Network Manager, the lower of the two boxes.
Here you might see 0 or more lines. The image is from an OSX host. I think on Windows hosts the "Name" field might hold some much longer name.

If you don't have any entries then you need to create one.
Click on the Create+ button in the top left corner.
If your host operating system is MS Windows, this operation might need Windows Admin rights. Look for the popup window that might be in the background.
Set the IPV4 Address/Mask to 192.168.56.1/24 to be similar to my setup. You don't need to enable the DHCP server for our configuration, but it won't hurt either so if it is on, leave it on.
Add host-only network to your VirtualBox guest
Each VirtualBox guest needs to be configured to use the Host-only network of VirtualBox.
For this click on Machine Tools.
Select your machine and click on Settings.
Click on the Network tab.
Adapter 1 is set to NAT.

Click to Adapter 2
Select "Attached to:" "Host-only Adapter".
Name: select the vboxnet0 or whatever it is called on your system.
Press OK.

You have now configured Host-only networking for this box.
Let's boot it now and make sure that Ubuntu is also configured properly.
Add an interface to Ubuntu Linux
Once the box is running, log in and run the following command:
$ ifconfig -a
This one shows the active network interfaces. We have two. The one created for the NAT Adapter and the "lo" the loopback interface so the computer can talk to itself.
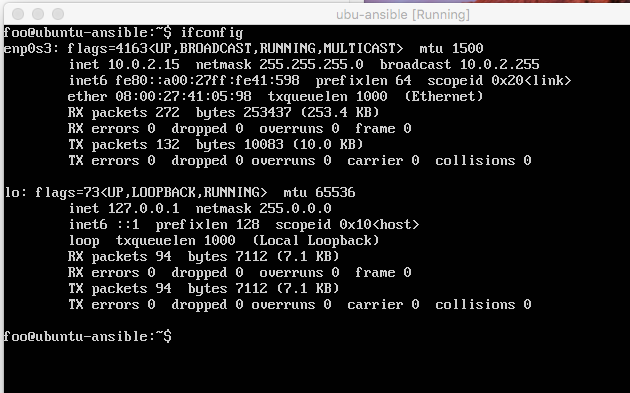
$ ifconfig -a
Will show all the interfaces, including the one that is not currently enabled. Here we can see an extra interface called enp0s8 that does not have an associated IP address.

We need to edit the file of the interfaces: /etc/network/interfaces.
As it is owned by root we need to use sudo. If you are not familiar with more powerful
editors then use nano:
$ sudo nano /etc/network/interfaces
Add the following lines to the end of the file:
auto enp0s8
iface enp0s8 inet static
address 192.168.56.10
netmask 255.255.255.0
Then we need to start the network card. We can either restart the machine using sudo shutdown -r now or
we can install software that can do it for us:
$ sudo apt-get install ifupdown
Start the network interface:
$ sudo ifup enp0s8
You can verify that the interface was configured by running ifconfig again and observing that there
are now 3 network cards listed and each one of them has an IP address.
In addition you can test this by opening the Cmd window of your Windows machine and type in
ping 192.168.56.10
You should be able to see 4 responses.
Install ssh server
By default this Ubuntu installation does not come with an ssh server so if you have not done so yet you will need to install it:
$ sudo apt-get install ssh
This installs and starts the server.
Self ssh
You can try the ssh server locally by trying to connect from your virtual Linux box back to the same virtual Linux box. Every linux machine has the IP address 127.0.0.1 to refer to itself, and by default every Linux machine maps the name localhost to this IP address. So if we ssh to localhost we are effectively talking to ourselves.
Type in:
$ ssh localhost
At first it will ask you to verify the "host" which in this case means the "remote machine" which is our Ubuntu Linux.
If you type in yes the ssh client will save the key of your sever in a file called .ssh/known_hosts
so it won't need to ask this question again and it will go on to ask you for your "remote" password.
As "remote" and "local" are the same machine now this the password of your Linux user.

If this is successful you can now open your ssh client on your desktop and connect to the Ubuntu machine.
On Windows you will need to download putty.exe (No need for the .msi file. Just download the exe and run it from the download directory or from the desktop)
You will need to type in the IP address of the "remote machine" which is our Ubuntu box 192.168.56.10 and then it will ask you for username and password.
@ WARNING: REMOTE HOST IDENTIFICATION HAS CHANGED! @
If this is not the first time you are setting up machines you might easily encounter an error message that looks like this:
@    WARNING: REMOTE HOST IDENTIFICATION HAS CHANGED!     @
@@@@@@@@@@@@@@@@@@@@@@@@@@@@@@@@@@@@@@@@@@@@@@@@@@@@@@@@@@@
IT IS POSSIBLE THAT SOMEONE IS DOING SOMETHING NASTY!
Someone could be eavesdropping on you right now (man-in-the-middle attack)!
It is also possible that a host key has just been changed.
The fingerprint for the ECDSA key sent by the remote host is
SHA256:HnZL2cdy+SVZ0PUwajmqndUgqWl0n7dLMEP3o4ZDZSw.
Please contact your system administrator.
Add correct host key in /Users/dpinchoff/.ssh/known_hosts to get rid of this message.
Offending ECDSA key in /Users/dpinchoff/.ssh/known_hosts:2
ECDSA host key for 192.168.56.10 has changed and you have requested strict checking.
Host key verification failed
Explanation
When you ssh to a machine the first time, ssh will ask the ECDSA key of the host. It will then ask you to verify that the key it received from the host is the correct key. This is used so you, the user, will know that you are connecting to the server you intended to connect to and not some other machine posing as that server. The question looks like this:
When you say "yes" to this, the signature of that server is saved in the ~/.ssh/known_hosts file. One line for each server you connect to in the format of
hostname server-key
or
IP-address server-key
Any subsequent time you connect to the same machine, ssh will verify that the key the remote server sends is the same as listed for the given hostname or IP address in the ~/.ssh/known_hosts file.
If it is the same key, the ssh process will continue and then the server will try to verify that you are who you claim to be. Either by asking your password or by asking you to use your private key to make sure it corresponds to the public key it has on file. (In the ~/.ssh/authorized_keys file on the remote machine)
If the ssh does not find the hostname or IP address of the remote machine in the ~/.ssh/known_hosts file of your local user, then it asks the question as we described above. If, however, the hostname was found, but the signature the server sent you is not the same as you have on file, then you get the above error message. (That claims to be as WARNING.)
This can happen either if you replaced the server machine with another machine, but used the same IP address and/or same hostname. Or if some other machine poses as your server. This is what's usually called man-in-the-middle attack. Even if the attacker is a woman called Mallory. It can happen for example if one of the boxes that acts as a router between you and the remote machine where your traffic passes will suddenly try to act as that remote server. If you don't notice this, you might type in your password and let the owner of that box, the man in the middle, know your password.
So if you get such message, start by being suspicious.
This can easily happen if you are currently playing with virtual images on your computer and you clone them and change their IP address and maybe you destroy one and then create a new machine with the same IP as you had earlier. In that case it is safe to accept the new signature. The way do that is that you edit the ~/.ssh/known_hosts file on the computer from which you run the ssh client and remove the line that corresponds to the specific server. This is the line that was mentioned in the above error message, in this case it is line 2 in the ~/.ssh/known_hosts file .
Offending ECDSA key in /Users/dpinchoff/.ssh/known_hosts:2
Remove line 2 from ~/.ssh/known_hosts. Then try to ssh again. It will ask you to verify the key of the remote host. When you say "yes" it will save that key in the ~/.ssh/known_hosts file.
Vocabulary clarification
VirtualBox uses host to describe your main operating system.
VirtualBox uses guest to describe the OS that is installed inside the VB image.
In networking terms the computer you are sitting at is usually called the client. The machine you are connecting to is usually called the server or the host.
In our setup the terms get mixed. Especially the word host It can both refer to your Windows system (VirtualBox host) and to the Ubuntu box which (network host). So make sure you understand which is which.
If it is still unclear, let me know and I'll try to further clarify it.
Comments
Err I think sysctrl has mucked up your tutorial. ping does not succeed ,, well it is bit of a bastard situation,, I hate systemd, so it is a lubuntu vm and devuan host Only because armbian specifys ubuntu 18.04 as a base for cross-compile chain I guess I should try under devuan??? ,, or else use vnc to control vm thoughts?
Very clean and precise walkthrough. Thank you for sharing!
How can we connect using ssh from a different network ? Assuming we know the public ip and all this info...
If you get a connection refused when ssh'ing to localhost, it probably means you don't have the ssh server package installed on your guest OS.
Thanks! worked like a charm
Thank you! I've wanted to set this up for awhile. My guest os is Redhat 7, so I had to use the NetworkManager to configure the new interface:
nmcli connection add type ethernet con-name enp0s8 ifname enp0s8 ip4 192.168.56.10/24
The configuration is automatically saved and the interface is started.
Thanks! this instrunctions solved my issues
